Roasted Vegetable & Toasted Orzo Soup

Soup season is all but over for me. I've always seen soup as a decidedly winter dish, so this is probably my last soup hurrah until fall.

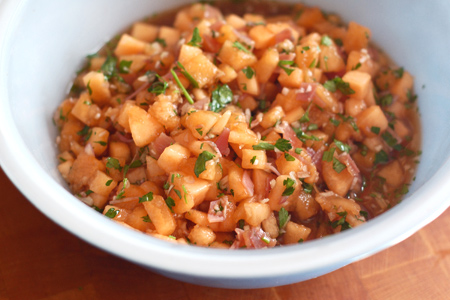
The title is self-explanatory. It's a medley of roasted vegetables, toasted orzo and grilled chicken in a light chicken and tomato broth. I was tempted to call it "Roasted, Toasted & Grilled Chicken Soup", but that seemed sort of silly. In any event, it's pretty tasty and good for you.

Ingredients
12 cups Chicken stock
1 lb Orzo
4 Roma tomatoes, seeded and chopped medium
3 large Carrots, chopped medium
3 small Zucchini, chopped medium
3 small Yellow squash, chopped medium
2 Grilled boneless/skinless chicken breasts, chopped medium
1 large Yellow onion, chopped medium
1/2 cup Italian parsley, chopped fine
5 sprigs Thyme, stripped from stems
1 Tbsp Tomato paste
Light olive oil
Garlic salt
Kosher salt
Black pepper

Method
Preheat your oven to 350º.

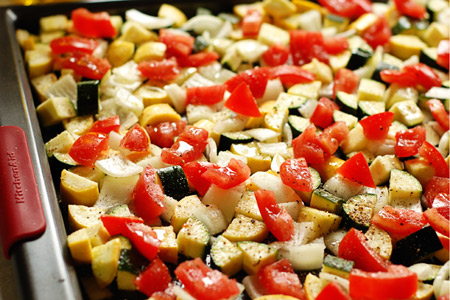
Arrange all of the vegetables, except the carrots, on a large sheet pan.

Season the vegetables liberally with garlic salt.

Roasted Vegetable & Toasted Orzo Soup

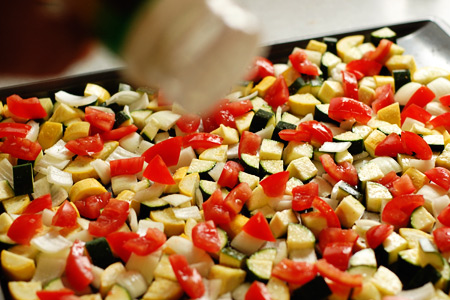
And, of course we need a good dose of black pepper.

Roasted Vegetable & Toasted Orzo Soup

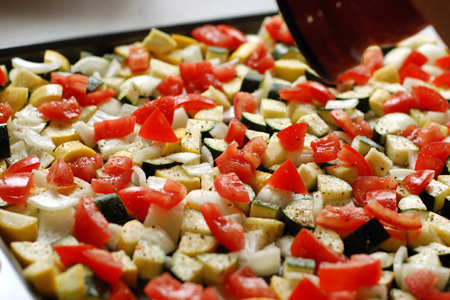
Drizzle a little olive oil over all of the vegetables.

Roasted Vegetable & Toasted Orzo Soup

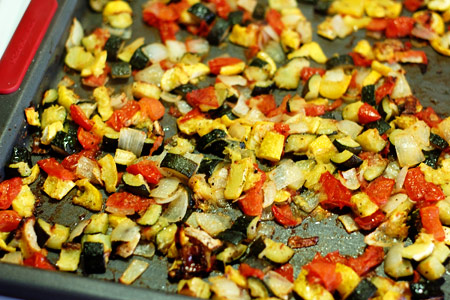
Roast the vegetables on the middle oven rack for an hour.

While the vegetables are roasting, toast the orzo.

Using a paper towel, wipe the entire inside of a large non-stick skillet with a very small of oil.

Heat the pan over medium-high heat.

Roasted Vegetable & Toasted Orzo Soup

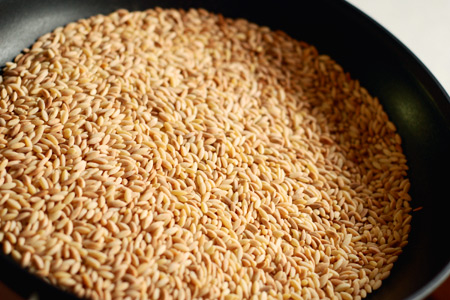
Add the orzo to the pan and toast, swirling and tossing often, until it is a very light brown.

Set the orzo aside to cool.

Heat a large stock pot over medium-high heat.

Add about a tablespoon of oil and heat for a minute.

Add the carrots to the pot and saute until the edges just start to brown.

Add the stock, tomato paste, parsley and thyme to the pot.

Bring the stock to a simmer, cover and cook for 10 minutes.

Increase the heat and bring the stock just to a boil.

Add the orzo, and cook to al dente per the package directions.

Roasted Vegetable & Toasted Orzo Soup

When the pasta is al dente, add the roasted vegetables and chicken to the pot.

Turn the heat off, cover, and let sit for about 10 minutes.

Adjust the seasoning with salt and pepper to taste.

Serve with some nice cheesy garlic bread and enjoy!

Roasted Vegetable & Toasted Orzo Soup
You eyeballin' me, boy?!

Labels: , ,

The Mother Of All Bakers

Folks, what you see here is not your average baked potato. Let me introduce The M.O.A.B. -- The Mother Of All Bakers. You see, that plate in the picture is 10 1/2 inches in diameter. We're talking about just under three pounds of loaded bacon-laden baker bliss.

I'm not normally one to jump on the over-the-top food bandwagon. This happened because of friendly visit from one of our neighbors. My wife IM'd me at work the other day and said that our neighbor, Tabatha, stopped by and gave us a bag of potatoes and onions. Of course, I thought that was a very kind of her. What I didn't know is that said potatoes were apparently grown in some field near a nuclear reactor.

The Mother Of All Bakers

Of course Idaho is known for our famous potatoes (it's even printed on our license plates), but these things are huge! I've lived here for 15 years and I have never seen potatoes even close to this large. I met the late billionaire potato magnate J.R. Simplot once and he offered to show me "a potato as big as a football". I thought it was an outlandish claim at the time, but I am a believer now.

After looking them over and chuckling under my breath in amazement, I set them aside. Then, on the way home from work tonight I had a moment of tuber clarity. I decided that these were destined to be baked and enjoyed as any fine Idaho Russet should.

Once I decided to bake them, I quickly realized that I had a problem. How in the world do you bake such a huge potato so that the inside gets done before the outside turns into a dry crusty mess?

Then it hit me. My mother used to stick these thick aluminum skewers through her potatoes when she baked them. I never really understood it until later in life. See, the idea is that the metal conducts heat into the center of the potato and thereby speeds the cooking. Well, it just so happens that I have some metal shish kabob skewers that would work nicely.

To me the skin is the best part of a properly baked potato. I like to oil the skin so that they get nice and almost crunchy. A baker should never see the inside of a piece of foil!

I also like bacon on my baker, but I didn't really want to deal with cooking the bacon. Eureka! I'll cook the bacon on the potatoes! This, I must admit, was a serious moment of kitchen resourcefulness for me. What could be better than bacon-coated baker skin?

Each was skewered and draped with four half-slices of bacon. I then hit them with a liberal dose of fresh-ground black pepper.

The Mother Of All Bakers

I baked them at 375º for 30 minutes, then I turned the heat down to 350º, cooked them for another 45 minutes. By this time the bacon was nicely done, so I removed it.

The Mother Of All Bakers

The potatoes were not even close to being done, so I rolled them around in the bacon fat and returned them to the oven. Forty five minutes later they were done. That's two hours of total cooking time.

It was now time to top this bad boy (only one, the other will be used later). Here are the toppings:

  • 2 tablespoons butter
  • 6 half-slices of bacon, chopped
  • The tops of an entire bunch of scallions, sliced
  • 1/2 cup sharp cheddar cheese, shredded
  • 3/4 cup light sour cream (I felt mildly guilty)

And there, ladies and gentlemen, you have The M.O.A.B. -- The Mother Of All Bakers. Sadly, I could only eat half of it, but I have lunch for tomorrow.

Review: World Spice Merchants
Quality fresh herbs and spices are a must! This is true in all cooking, but it is especially true in competition. As a competitive BBQ cook, I have one or maybe two bites to get the attention of the judges. Since barbecue is essentially meat, spice, smoke and sauce, you simply can't afford to skimp on spices.

I make my own brines, rubs, and sauces for competition and my go-to company for outstanding herbs and spices is World Spice Merchants in Seattle. I have been using their products for years, and I have always been more than completely satisfied.

What makes World Spice Merchants so good? Their products are always incredibly fresh, and the quality is unmatched in my experience. Additionally, their prices are very reasonable and their shipping is quick. Oh, and get this, they still trust their customers enough to ship your order and bill you. In fact, for the first two years that I ordered from them you literally could not pay for your order online. How cool is that?!

If you want to give your cooking the utmost in flavor, hit up the folks at World Spice Merchants. I promise that you will be more than happy.

Labels:

Orange-Glazed Pork Cutlets

Tonight was one of those nights. You know, the kind where you are making up dinner as you frantically roam the isles of the supermarket. Yeah, the ones when the family has a gazillion things going and you need something for dinner. The kind of night where you and your spouse contemplate a quick trip to the drive-thru, but you quickly realize that you've been there far too often lately. It was one of those nights, and here is what became of dinner.

These are quick-n-easy center cut pork cutlets that are sauteed then glazed with some simple orange marmalade. The only thing I did that was even mildly unusual was to season the cutlets with alderwood-smoked salt. I thought it would add an extra something to the flavor.

Ingredients
6 center cut Pork loin chops (about 1/2" thick -- I cut my own from a roast)
6 Tbsp Orange marmalade
1 Tbsp Canola oil
2 tsp Smoked salt (or plain kosher is fine)
Black pepper

Method
Put two chops in a gallon zip-top bag and pound each lightly until they are just over 1/4" thick, then move to a platter or rimmed sheet pan.

Repeat with the remaining chops.

Orange-Glazed Pork Cutlets

Season both sides of each breast with salt and pepper, cover and let sit at room temperature for about 20 minutes.

Heat the oil in a large skillet over medium-high heat

When the oil just starts to smoke, add the cutlets.

Cook them for 90 seconds.

Orange-Glazed Pork Cutlets

Flip the cutlets and immediately top each with a tablespoon of marmalade.

Let them cook about 90 seconds more.

Flip the cutlets again and cook for about 30 seconds. The marmalade will turn itself into a very nice glaze.

Serve each cutlet with a drizzle of the glaze that is remaining in the pan.

Enjoy!

Labels: ,


Grilled Malibu Chicken

Here is a great way to add some much needed pizazz and wow factor to grilled boneless-skinless chicken breasts. As I've said before, they certainly need all the help they can get.

The breasts are marinated in a dry rub, grilled with a pineapple mustard mop sauce, then topped with sliced deli ham, Swiss cheese and a pineapple ring. It's almost like an inside-out cordon bleu that can be served plated, or as a sandwich on a hearty bun.

Ingredients
6 Boneless/skinless chicken breasts
12 slices Deli ham (thin)
6 slices Canned pineapple
6 slices Swiss cheese (I used Boar's Head® Baby Swiss)
1/2 cup Pineapple juice
4 Tbsp Unsalted butter, melted
2 Tbsp BBQ seasoning (I used Sucklebusters Hoochie Mama)
1 Tbsp Plain yellow mustard
1 Tbsp Honey
1 Tbsp Molasses
2 tsp Worcestershire sauce
1 tsp Chili powder

Method
Put a breast in a gallon zip-top bag and pound the thick end until the entire breast is uniform in thickness, then move to a platter or rimmed sheet pan.

Repeat with the remaining breasts.

Season both sides of each breast with the BBQ seasoning, cover and refrigerate at least an hour.

Combine the butter, pineapple juice, mustard, honey, molasses, Worcestershire sauce and chili powder a medium mixing bowl and whisk until smooth, then set aside.

Prepare your grill for two-zone cooking (direct and indirect) at medium-high heat (about 400º).

Quickly grill one side of each breast and each pineapple ring over direct heat until they are seared and have nice grill marks, about two minutes.

Flip each breast and ring, brush with the sauce, and cook another two minutes.

Move the chicken to the indirect part of the grill and brush the top of each with the sauce.

Top each breast with two slices of ham and drizzle the ham with the sauce.

Put a slice of cheese then a pineapple ring on each breast and drizzle yet again with the sauce.

Continue cooking with the grill lid down until the internal temperature reaches 160º, about 10 minutes.

Serve with, yes, you guessed it, a drizzle of sauce.

Enjoy!

Labels: ,


Guinness® BBQ Sauce

I created this sauce for my St. Patty's Day broiled lamb chops, but it turned out to be so good that I think it warrants its own post. It has a good balance of sweet and savory, but maintains the unmistakable flavor of Guinness®. My kids even liked it, which is a great testimony for an on-the-fly recipe.

Ingredients
1 1/2 cups Guinness® Extra Stout
1/2 cup Chili sauce (I used Heinz)
1/2 cup Brown sugar
2 Tbsp Red wine vinegar
1 Tbsp Worcestershire sauce
1 Tbsp Pickapeppa sauce
1 Tbsp Honey
1 tsp Garlic salt

Method
Add the beer and garlic salt to a medium sauce pan and whisk to combine.

Heat the pan over medium heat, add the remaining ingredients, and whisk to combine.

Simmer until the sauce is reduced by half (about 15-20 minutes) and set aside to cool.

Brush it on your carnage of choice during the last 5-10 minutes of cooking.

Enjoy!

(makes about 1 1/4 cups)

Labels: ,


Broiled Lamb Chops with Guinness® BBQ Sauce

By the time I post this it will be St. Patty's Day, so I've obviously succumbed to the expectation to have an appropriate Irish-inspired recipe. I've tried to be somewhat creative and I think it has paid off. I hope you agree.

This is a relatively simple dish that is big on flavor. The barbecue sauce is a good balance of sweet and savory, but maintains the unmistakable flavor of Guinness®. What better way to use it than slathered on a nice piece of lamb? The two work very well together.

Note: This recipe calls for a cast iron grill griddle, but a standard broiler pan will certainly suffice.

Ingredients
4 Lamb arm chops (about 3/4" thick)
1 1/2 cups Guinness® Extra Stout
1/2 cup Chili sauce (I used Heinz)
1/2 cup Brown sugar
2 Tbsp Red wine vinegar
1 Tbsp Worcestershire sauce
1 Tbsp Pickapeppa sauce
1 Tbsp Honey
1 tsp Garlic salt
Kosher salt
Pepper
Canola oil

Method
Add the beer and garlic salt to a medium sauce pan and whisk to combine.

Heat the pan over medium heat and add the chili sauce, brown sugar, vinegar, Worcestershire, Pickapeppa, and honey.

Whisk the sauce ingredients together and bring to a simmer.

Simmer until the sauce is reduced by half (about 15-20 minutes) and set aside.

Broiled Lamb Chops with Guinness® BBQ Sauce

Season both sides of each chop with salt and pepper and let sit at room temperature for 20-30 minutes.

Move your oven rack so that it is about three or four inches from the broiler element (top of your oven).

Put the griddle/pan on the rack and preheat your oven to 550* for about 20 minutes.

Turn the oven to broil.

Brush both sides of each chop with a thin coat of canola oil.

Broil the chops on the griddle/pan for three minutes.

Flip the chops over, brush quickly with the sauce, and broil another three minutes.

Brush the top of each chop quickly with the sauce, broil another 30 seconds.

Note: These cooking times are approximate for medium-rare, so adjust accordingly.

Remove the chops to a platter, tent with foil, and let them rest about five minutes.

Broiled Lamb Chops with Guinness® BBQ Sauce

Drizzle each chop with sauce, serve and enjoy!

Labels: ,


Kiwi Knives
Back in January I wrote about my discovery of Kiwi knives from Thailand. Well, I've been using them diligently for a little more than two months, so I thought I'd post a follow up.

In the original post I described them as "like razor blades with handles", and they are definitely that. I've found that, with regular maintenance from a steel, they hold an edge amazingly well for such a thin blade.

As I mentioned in my discussion on the BBQ Central Radio podcast, these knives are serious prep machines. The thin, light, and flexible blades make prep work all but effortless. In fact, I often find myself reaching for them rather than my Global or Wusthof knives. They are just a joy to use.

At two months in, I can say that you really can't go wrong with these; especially at such an insanely low price.

Labels: ,

Cantaloupe & Prosciutto Salsa Cruda

Here's a funky sweet and savory salsa that makes use of the well-known flavor marriage of cantaloupe and prosciutto. I served it with some sweet potato and carrot chips, but I think it would be outstanding atop a nice piece of grilled mild fish. It might also be a good accessory to a grilled salad.

Cantaloupe & Prosciutto Salsa Cruda

Ingredients
1 medium Cantaloupe
1 large Shallot
4 slices Prosciutto (a little thicker than paper-thin)
1 handful Italian parsley
2 Tbsp Balsamic vinegar
2 Tbsp Honey
1 tsp Kosher salt
1 tsp Ground white pepper

Method
Cut the cantaloupe in half and seed it.

Note: If you don't want to use the rind as bowl, skip the next three steps.

Cantaloupe & Prosciutto Salsa Cruda

Use an ice cream scoop to remove all but about 1/4" of the flesh from one half of the melon, as shown. Set the flesh aside.

If the hollow rind won't sit upright on its own, cut a small sliver off of the bottom center to make a flat spot.

Put the rind bowl in a large zip-top bag and freeze it.

Cantaloupe & Prosciutto Salsa Cruda

Cut all of the melon to a medium dice and put it in a large mixing bowl.

Cantaloupe & Prosciutto Salsa Cruda

Chop the prosciutto to approximately 1/4".

Mince the shallot and chop the parsley (medium - you need about 1/3 cup).

Note: This kind of prep work is where the uber-cheap and scary-sharp Kiwi knives really shine. They are prep machines!

Cantaloupe & Prosciutto Salsa Cruda
Add the prosciutto, shallot, parsley, salt and pepper to the mixing bowl.

Whisk the vinegar and honey together in a small bowl, then add it to the melon.

Mix the salsa well, cover and refrigerate at least two hours, stirring occasionally.

Serve and enjoy!

Labels: , ,


Kosmo's Q Chicken Soak
You might remember that I've recently reviewed both the beef and pork injections from Kosmo's Q. This time out I'll be giving my thoughts on the relatively new Chicken Soak product from Kosmo.

Let me be clear in saying that I am a huge fan of brining poultry. I won't get into all the science of osmosis and the denaturing of protein here, but suffice it to say that it really works wonders. The bottom line is that it adds a ton of flavor and moisture to what can often otherwise be dry and boring meat.

Not only is brining just an all-around good idea, it's indispensable in competition barbecue. At a contest you have one or maybe two bites to impress the judges. Flavor and moisture are the two main criteria that will separate a competitor from the also-rans.

One of the pains of brining is the cooking that is required to get all of the sugar and salt dissolved into a solution. Then you have to cool it down. My typical process entails making what I call a "brine concentrate". That means that I add just enough water to the sugar and salt to get them dissolved, then I dilute it when I'm ready to use it. For competition, this minimizes the hassle when I get there, but in reality I've just shifted the work. I still have to make the concentrate.

Here is where I think Kosmo's Chicken Soak really shines. It contains very similar ingredients to my usual brine, but it dissolves in cold water. You just add 3/4 cup of the dry mix to a half-gallon of water, stir, and go. Just soak the chicken parts for four hours, then barbecue or grill as you normally would. There's no muss and no fuss.

The labor savings are all well and good, but how good is it? I will say that this product works exceedingly well. It dissolves quickly in cold water with no caking or lumping. As for flavor and added moisture, it's great. I cooked up some boneless/skinless breasts and bone-in thighs and both were outstanding. I'd put this up against my competition brine any day.

Labels: ,

Slammin' Salmon

As I mentioned yesterday, I planked some salmon tonight for dinner. I used the Asian Barbecue Glaze and it was incredible, if I do say so myself. In fact, it was so good that I've decided to go with the title you see above rather than the "Asian Barbecued Salmon" title that I had originally planned. The old title somehow seems more than a little lacking now.

Of course cedar planks and salmon are made for each other; that's certainly no secret. However, the addition of the glaze takes things to a much higher level. The subtly smokey fish combined with the cherry and hoisin work wonderfully together.

Ingredients
2 Food-safe cedar planks (about 3/8" thick)
1 large Salmon filet (about 3 pounds)
1 cup Asian Barbecue Glaze
Kosher salt
Pepper
Canola oil

Method
Soak the cedar planks in warm water for about two hours. Make sure they stay submerged.

About 30 minutes before you are ready to start cooking, start your grill and prepare for direct cooking over a medium-hot fire (375-400º)

Cut the salmon filet in half width-wise.

Season both sides of each half lightly with salt and pepper and brush with a light coat of oil.

Place each half of the filet on a cedar plank with the skin-side down.

Note: If the filet has a thin tapered belly edge, fold it under as you see in the picture below (bottom edge of the lower filet).

Slammin' Salmon

Put the planks directly over the coals/flame and close the lid.

Slammin' Salmon

Cook until you start to see a milky white edge form near the thick end of the filets (about 20 minutes at 375º).

Slammin' Salmon

Brush the top of each filet with a liberal coating of the glaze.

Continue cooking for another five minutes.

Brush the top of each filet with another liberal coating of the glaze.

Continue cooking for another five minutes.

Remove the planks to a sheet pan.

Portion the filets and drizzle each with a little of the glaze.

Serve and enjoy!

Labels: ,


Asian Barbecue Glaze

I made this glaze today for some salmon that will be cedar-planked on the grill for dinner tomorrow, so I thought I'd post it.

As the name implies, it's an Asian-inspired glaze that is great on anything grilled where a little sweet-and-sour eastern influence is welcome. The cherry preserves and hoisin sauce work magically together, and the white pepper adds a bit of a spicy finish. It's simple, but it does incredible things.

Ingredients
3 Scallions (green tops only), washed and sliced thin
1/3 cup Cherry preserves
1/4 cup Hoisin sauce
1/4 cup Mirin
1/8 cup Seasoned rice wine vinegar
1/8 cup Water
1/8 tsp Ground ginger
1/8 tsp Ground white pepper
10 drops Sesame oil

Method
Add all of the ingredients, except the water, to a small sauce pan.

Put the pan over medium heat and bring just to a simmer.

Let it simmer for five minutes, then remove from the heat.

Put the sauce in a small bowl or jar and add the water.

Blend with a stick blender for just a few seconds to get rid of any cherry chunks.

Let cool and use as you would any glaze, and enjoy!

(makes one cup)

Labels: ,


Grilled Salad

Grilled salad?! Yes, it may sound odd to some of you, but the ladies here give it rave reviews. This is not a unique idea, lest you think I've completely made this up. A quick search of the internet will reveal many versions.

Let's look at this pragmatically. If you're taking the time to fire up the grill to cook up some carnage, why not get a very simple but impressive side dish out of the deal? It's dirt cheap, incredibly simple, but has enough wow factor to impress your family or guests.

This is clearly on the short list of the simplest recipes that I've posted to-date. My version adds a little bit of a Mediterranean flair, but you finish it how you like. I've done this with bleu cheese dressing and it was a hit. It would even work well with the Idaho state dressing -- ranch.

Ingredients
2 heads Romaine lettuce, washed and dried
1/2 cup Feta cheese, crumbled (I used garlic and herb)
1/2 cup Balsamic vinaigrette (I added some honey to mine)
Oil (I used Pompeian OlivExtra Plus)
Kosher salt
Pepper

Method
Split each head of lettuce lengthwise.

Drizzle the cut side of each half evenly with a tablespoon or two of oil.

Season the cut side of each half with salt and pepper.

Grill each half, cut-side-down, over a hot direct fire for about 90 seconds.

Grilled Salad

Remove to a sheet pan, sprinkle evenly with the cheese and let cool.

Drizzle each half with an equal amount of dressing.

Cut each half in half width-wise, serve and enjoy!

Labels: , ,

<< Older Posts

Newer Posts >>


Popular Recipes
All-Purpose BBQ Seasoning Braised Nectarines with Champagne Honey Caramel Classic BBQ Chicken Drumsticks Cuban Rueben Grilled Chicken Cordon Bleu Homemade Hot Sauce Hungarian Braised Short Ribs The M.O.A.B. Pulled Pork Pockets Rattlesnake Tails Slammin' Salmon Sweet-n-Sassy BBQ Almonds View all of my recipes
 
Other Popular Posts
Competition BBQ 101 Review: Original vs Competition Kingsford® Charcoal Review: Kingsford® Competition Briquetes Discovery: Kiwi Knives Discovery: Quality Inexpensive Injector Book Review: Serious Barbecue