The Funky Cristo

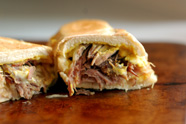
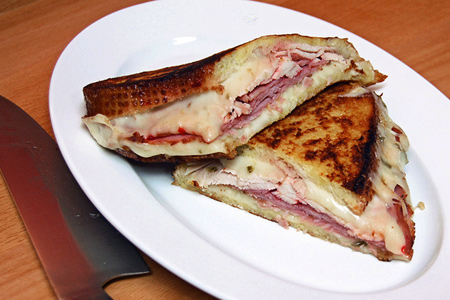
I dreamed this sandwich up as a new and unique twist on a traditional Monte Cristo sandwich. Our middle daughter Shelby shot some video of me making the beta version. She enjoyed it, and it's been a long, long time since I've done a recipe video, so I thought we'd spend a little daddy-daughter time and remedy that situation.

There are several variations of the standard Monte Cristo. It can be as simple as a fried ham and cheese, but it typically also contains sliced turkey and is dusted with powdered sugar. Many are served with jam or jelly.

To funkify mine I use good crusty sour dough bread, pepper-jack instead of the usual Swiss or Gruyere, and good dose of nicely spicy jalapeno jelly. The combination really works well.

Let me show you how all of this comes together.


Ingredients
2 slices Sourdough bread
4 slices Pepper-jack cheese (or enough to cover the bread)
4 slices Ham, thin
4 slices Turkey, thin
2 Tbsp Jalapeno jelly, medium
2 Tbsp Milk
1 Egg
2 Tbsp Butter, unsalted

Method
Heat the butter large saute pan over medium heat until the butter is melted and starting to foam.

Cover the inside of each bread slice with the cheese.

Lay the ham on top of the cheese on one piece of the bread, and the turkey on the other.

Spread the jelly over the ham, then gently fold the two halves of the sandwich together to assemble it.

Whisk the egg and milk well in a flat shallow pan large enough to allow the sandwich to lay flat. Put the sandwich in the egg mixture for about five seconds, pressing down gently. Turn the sandwich over and repeat on the other side.

When the butter is melted and foaming, lay the sandwich in the pan and let cook 2-3 minutes, or until it's a nice golden brown color that resembles French toast. Gently flip the sandwich over and continue cooking until the second side looks http://www.blogger.com/img/blank.gifthe same as the first.

Remove the sandwich from the pan, place it between two double layers of paper towel and gently press down on the top to remove any excess butter.

Slice the sandwich in half, serve and enjoy!

Note: I have other recipe videos here.

Labels: , ,

I double dog dare you not to laugh.


On a very serious note, let us all remember the real reason for the celebration and praise of this Christmas season.


I wish you all a very merry and blessed Christmas.

John
Review: Kingsford® Competition vs Stubb's® Briquets

All-natural charcoal briquets have become increasingly popular over the past few years. That's especially true in the world of competition barbecue. This style of briquet is popular because it's essentially lump charcoal in briquet form. You get the high heat of lump with the convenience, uniformity, and predictability of a briquet.

Both the Kingsford® Competition and Stubb's® Briquets have been on the market for nearly three years now, but the Stubb's® product is new to me. I've been seeing quite a bit of banter about it on the various barbecue forums that I frequent, so I thought that it's time that I put these products to a briq-to-briq showdown.

As in my previous side-by-side charcoal reviews (the others are linked at the end of this post) I wanted this comparison to be as fair and impartial as I could make it. I don't have a laboratory, but I am an engineer, so I did the best that I could in a home setting. I ran side-by-side tests of two brand new off-the-shelf bags of each product. As you will see, I've weighed and photographed each product so that you can see exactly what I saw.

Let's see how these products compare.

I first weighed various quantities of each product. This will help quantify the bang-for-the-bag of each. It will also let us see how much of the product is left as ash, as we'll see at the end.

1 Briquet: 5/8 oz

5 Briquets: 3 3/8 oz

10 Briquets: 6 3/4 oz

1 oz

5 oz

10 oz


Review: Kingsford® Competition vs Stubb's® Briquets

For the burn test, I punched two aluminum pie pans with an identical pattern of holes. I wanted to use a method that would contain the ash for a final weight.

I then arranged each of the briquets in each pan as similarly as I could. I used 12 briquets in each, in layers of six, four, and two. I put a single Weber wax starter cube in each pile.

I lit each cube and took pictures at various intervals.

From here on the Kingsford® Competition briquets are pictured on the left, and the Stubb's® on the right.

Note: If you're interested, the temperature when I started the burn was 39º and the humidity was 84%.


Review: Kingsford® Competition vs Stubb's® Briquets

Houston, we have ignition!


Review: Kingsford® Competition vs Stubb's® Briquets

5 Minutes


Review: Kingsford® Competition vs Stubb's® Briquets

10 Minutes


Review: Kingsford® Competition vs Stubb's® Briquets

15 Minutes


Review: Kingsford® Competition vs Stubb's® Briquets

20 Minutes


Review: Kingsford® Competition vs Stubb's® Briquets

30 Minutes: 633º

702º


At 30 minutes I started taking temperature measurements. I used a TW8060 two-channel thermocouple thermometer that was provided by the great folks at ThermoWorks for the purpose of this review.

Review: Kingsford® Competition vs Stubb's® Briquets

This thermometer, like their incredible Thermapen™ is dead-accurate, and with a range of -328 to 2372°F it seriously blows the doors off of the infrared thermometer that I used in my previous reviews. The long industrial probes allowed me to measure the temperature just above the coals where your food sits.

Review: Kingsford® Competition vs Stubb's® Briquets

I stopped taking pictures at 120 minutes, but I continued reading the temperatures out to 180 minutes.

Review: Kingsford® Competition vs Stubb's® Briquets

35 Minutes: 478º

539º


Review: Kingsford® Competition vs Stubb's® Briquets

60 Minutes: 466º

424º


Review: Kingsford® Competition vs Stubb's® Briquets

90 Minutes: 520º

341º


Review: Kingsford® Competition vs Stubb's® Briquets

120 Minutes: 232º

180 Minutes: 140º

205º

92º

Here's a chart that shows the temperature readings of each product over time. The horizontal axis is time and the vertical shows the temperatures.

Review: Kingsford® Competition vs Stubb's® Briquets

What about ash? Well, the results were surprising. The Stubb's® briquets produced nearly 250% more ash by weight than the Kingsford® Competition briquets. I was also surprised at the density of the Stubb's® ash. As you can see in the picture below, it held its shape fairly well, as opposed to the Kingsford® ash which collapsed.

1 7/8 oz

4 5/8 oz


The bottom line is that, while the Stubb's® product starts stronger, it loses its firepower more quickly and produces far more ash than the Kingsford® Competition briquets. There's more product by weight in each bag of Stubb's, but there's also much more that goes to waste.

I hope that you've found this review to be informative and helpful.

Obligatory Disclaimer: This is not a paid endorsement. It simply reflects my honest findings and opinions.

You might also be interested in my previous charcoal reviews.

Original vs Competition Kingsford® Charcoal
Old vs New Kingsford® Charcoal

Labels: ,


Steakhouse Philly

I know that you might be thinking, "Another Philly cheese steak recipe? Really?!" Yeah, I'll admit that I initially thought the same thing as I was putting this recipe together. However, let me assure you that this is a cheese steak that packs a top-shelf punch.

There are relatively few times when I have a mess of steak leftover. In this case it was due to me finding an absolutely killer deal on some chuck eye steaks. I bought all they had and figured that I'd worry about what to do with them later.

Let me digress for just a moment. If you've never heard of or tried a chuck eye steak, do yourself a huge favor and remedy that situation. Frequent readers know that I've occasionally preached the virtues of the flat iron steak. Well, the chuck eye is another little-known bargain cut that eats like a steak of at least twice the price. Both come from the chuck primal and are simply outstanding on the grill.

Now back to the task at hand -- a cheese steak elevated. Since this steak is so good I wanted to come up with a recipe that would be something special. Give this a try and let me know if you agree.

Ingredients
4 Good hoagie rolls
12 slices Pepper jack cheese (enough to cover the inside of each roll)
8 oz Grilled steak, sliced to 1/8"
2 Tbsp Butter, unsalted
1 Tbsp Olive oil
1 clove Garlic, crushed
4 Large Crimini (baby Portabella) mushrooms, sliced to 1/4" (about 2 cups)
1/2 Large yellow onion, sliced to 1/4" (about 1 1/2 cups)
1/8 cup Dry red wine
2 Tbsp Worcestershire sauce
1 tsp Black pepper, ground fresh

Method
Heat the butter and oil in a large saute pan over medium-high heat until the butter is melted and starting to foam.

Add the garlic to the pan, reduce the heat to low and let cook about two minutes, stirring occasionally. Remove and discard the garlic.

Return the pan to medium-high heat, add the pepper, onions and mushrooms. Saute until the onions are translucent and the mushrooms are tender (about 10 minutes), stirring or tossing frequently.

Reduce the heat to medium, add the wine and Worcestershire sauce to the pan and cook 5 minutes, stirring or tossing frequently.

Steakhouse Philly

Add the steak to the pan, reduce the heat to low, and cook just long enough to heat the steak through, about 5 minutes.

Steakhouse Philly

Line each roll with enough sliced pepper jack to cover it. Fill each roll with an equal amount of the steak mixture.

Serve and enjoy!

Labels: , ,


Review: Splash-Proof Thermapen™

Let's face it, we barbecue and grilling folk are all about the tools and gadgets. We'll try almost anything that we think will improve our results. Because many gadgets are disappointing we also tend to be a skeptical bunch. So, when you hear a consistent and nearly unanimous consensus about a given tool or gadget, it speaks volumes. The Thermapen from ThermoWorks clearly falls into that category.

I'll be honest and say that, although I've heard many of the cooks I respect preach the virtues of the Thermapen for years, I've only recently tried one because the great folks at ThermoWorks asked me to take it for a spin. Until now I've been content with spending $10 - $30 on all manner of thermometer, only to be disappointed and start over. Now I know what I've been missing.

I think that there are relatively few things that cooks look for in a good thermometer. We want accuracy, a quick read, ease-of-use, and dependability. When I pull out a thermometer I want to know that I'll get consistent accurate readings with no hassle. I don't want to wonder if the thing is lying to me. This is especially true in competition barbecue where you've got hundreds, if not thousands, of dollars on the line with very little margin for error.

I've had my Thermapen for a few weeks and it is an absolute dream come true. The thing is dead-accurate and reads in three seconds with pinpoint precision, thanks to its narrow tapered probe. I did a side-by-side test with boiling water and ice water and I was simply amazed at how fast it reads. Gone are the days of standing with my hand over a hot fire waiting for El-cheapo thermometer to tell me if my food is done.

Check out the specs on this bad boy!

  • Range: -58.0 to 572.0ºF (-49.9 to 299.9ºC)
  • Accuracy: ±0.72ºF (±0.4ºC) from -58 to 392ºF (-49.9 to 199.9ºC), ±1.8ºF (±1.0ºC) from 392 to 572ºF (200 to 299.9ºC)
  • Resolution: 0.1ºF/ºC full range (user reconfigurable to 1.0ºF/ºC)
  • Response Time: From 75ºF to 32ºF: ≤ 3 seconds to within 1ºF
  • Probe: 4.5" length, High Performance Type K Thermocouple
  • Display: 0.55" (14mm) LCD
  • Auto Shutoff: 10 Minutes (user reconfigurable to disable auto-off)
  • Environmental Range: -4 to 122ºF (-20 to 50ºC)
  • Battery: CR2032 (3V) lithium coin cell x 2, 1500 hours
  • Dimensions: 6.1" x 1.85" x 0.75" (153 x 47 x 19 mm)
  • Weight: 0.25 lbs (97g)
  • NIST-Traceable calibration certificate

Pretty impressive, no?

If, like me, you're tired of being like a rat on a wheel dealing with cheap thermometers, do yourself a huge favor and spring for one of these. Yes, I know, they seem spendy on the surface, but I guarantee that you'll never regret the decision. It really is as good as you've probably heard.

Likewise, if you have a cook in your life and you want a great gift idea, look no further. You'll be a hero to them for a long time to come.

Disclaimer: ThermoWorks provided me the Thermapen™ free for the purpose of this review, but the thoughts expressed are my own, and I stand by them.

Labels:

<< Older Posts

Newer Posts >>


Popular Recipes
All-Purpose BBQ Seasoning Braised Nectarines with Champagne Honey Caramel Classic BBQ Chicken Drumsticks Cuban Rueben Grilled Chicken Cordon Bleu Homemade Hot Sauce Hungarian Braised Short Ribs The M.O.A.B. Pulled Pork Pockets Rattlesnake Tails Slammin' Salmon Sweet-n-Sassy BBQ Almonds View all of my recipes
 
Other Popular Posts
Competition BBQ 101 Review: Original vs Competition Kingsford® Charcoal Review: Kingsford® Competition Briquetes Discovery: Kiwi Knives Discovery: Quality Inexpensive Injector Book Review: Serious Barbecue