Click to view a larger image
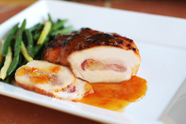
Tonight I was making some farfalle (Italian for "butterfly", American for "bowtie") Alfredo and I wanted some chicken to go with it. I wanted something that tasted Italian, but I needed it to be quick and easy.

You don't need me to tell you that boneless skinless chicken breasts can be, and often are, boring. The good news is that they are good for you and, with a little help, can be quite nice. My family enjoyed these, and they are certainly better than what you'd be served at most chain Italian restaurants.

Using some standard ingredients I was able to come up with something that was just what I was after. I thought I'd write a quick post to share it while it's still fresh in my mind. Be sure to see the afterthoughts at the end for more ideas.

Ingredients
3 Boneless skinless chicken breasts, well-trimmed
1 Tbsp Olive oil
1 tsp Dry Italian seasoning
4 Tbsp Italian salad dressing (I used zesty Italian)
Salt
Pepper

Method
Pound each breast between layers of plastic wrap to get them to a uniform thickness (about 1/2").

Season each side with salt and pepper.

Sprinkle the top (nice clean side) of each breast with Italian seasoning and let them sit at room temperature for about 10 minutes.

Heat a large saute pan over medium-high heat and add the olive oil.

When the oil just starts to smoke, add the chicken breasts, Italian seasoning-side down.

Cook approximately three minutes.

Just before you turn them, add about two teaspoons of the Italian dressing to the what is now the top of each breast.

Turn the breasts over and add another two teaspoons of the Italian dressing to the cooked side of each breast (click the picture to see this step).

Continue cooking another three minutes, shaking the pan occasionally to help distribute the dressing.

Turn the breasts again and cook another minute.

Remove to a plate and let them rest about five minutes.

Slice and enjoy.

Afterthoughts:
  • Of course, this would also work very well on the grill. I just happened to be indoors today.
  • The leftovers make a great chicken salad. Just chop the cooled breasts into 1/3" cubes and mix with some diced celery, sliced scallions, mayo (low fat or olive oil-based are good healthier options), garlic salt, pepper, and some Italian dressing. Refrigerate at least one hour to allow the flavors to marry. Put some of this salad on a flour tortilla (I like spinach or sun-dried tomato) with some lettuce and tomato, wrap, and enjoy a great simple lunch.

Labels: ,


Click to view a larger image
The good folks at Barber Foods have a new product that I was fortunate to review. They are called Chicken Grillables™, and they are all-natural (no artificial ingredients and minimally processed) and lightly seasoned frozen chicken burgers. Click the image for a closer look.

A quick glance at the ingredient list was a pleasant surprise. These are truly a good alternative to the basic burger. Each patty is 140 calories with only 5 grams of fat. I'm all for healthy alternatives, but the proof is ultimately in the taste.

I cooked the patties over charcoal exactly according to the package directions. That means six minutes per side over a medium fire. My family was pleased with the results. My ladies are sauce queens, so I insisted that they initially taste them with only a little mayo. My middle daughter said they were "moist and delicious". They were a hit.

So, the bottom line here is that these are well worth trying. They are a healthier alternative to the typical burger. They are brain-dead easy to prepare and don't leave you feeling deprived.

I recommend these, and I encourage you to be creative and kick them up with some teriyaki sauce, Swiss cheese, and a grilled pineapple ring, or whatever you like. You can find a local retailer here.

Here are some other topping ideas, off the top of my head:

  • Buffalo - 2/3 Frank's Red Hot sauce and 1/3 mayo, mixed well.
  • Italian - A slice of mozzarella cheese and pizza sauce.
  • Western - BBQ sauce and a slice each of pepper jack and red onion
  • General Tso - Hoisin sauce (supermarket Asian section) and Tabasco, or this sauce, with some sliced scallions.
  • California - Monterrey Jack, sliced avocado, and maybe some bacon and/or sprouts.
  • Cape Cod - A slice of Dill Havarti cheese and a nice smear of smashed cranberry sauce.
  • Mexican - A slice of pepper jack, guacamole, and picante sauce or salsa.
  • Cordon Bleu - A slice each of ham and Gruyere or Swiss cheese, with a little mustard and mayo.
  • Sweet & Sour - A little of your favorite sweet & sour sauce, and a grilled pineapple ring.
  • Shroom & Swiss - A slice of Swiss cheese, and grilled or sauteed mushrooms.

Labels: ,


Click to view a larger image
If you like pulled pork, but are lazy or just pressed for time, here is a great solution.

Pulled pork these days is usually made from a pork "butt", which can also be called a "Boston butt", or a "shoulder blade roast". For those of you lacking in the area of porcine anatomy, the "butt" part has nothing to do with the south end of a hog. It's actually the larger, or "butt" end of the shoulder (separated from the "picnic" end). Yes, it's confusing, but you can apparently thank the Brits for that.

In any case, true barbecued pulled pork is usually a long process. The average butt weight is typically 7 to 8 pounds, and takes about 60-90 minutes per pound to cook low and slow. Some quick math shows you what you're up against. It's well worth the wait, but sometimes you just need something faster and easier.

This recipe will give you great pork in a small fraction of the time. It's not really the real thing, but most folks will not know the difference. See, we're going to use country-style pork ribs which, ironically, are just slices of the same butt. I know what many of you are thinking about the "ribs" part of that statement, but don't ask. Using slices simply means that we can cook much faster.

Let's get on it.

Ingredients
5-6 lbs Country-style bone-in pork ribs (big and meaty ones)
1/4 cup Cheap yellow mustard
1/3 cup Your favorite BBQ seasoning (of course I recommend mine)
1 1/2 cups Apple juice

Note: You will also need a large disposable aluminum pan. Look for the deepest one you can find.

Method
Put the ribs on a sheet pan

Smear all sides of each rib with a very thin coat of the mustard.

Sprinkle all sides liberally with the seasoning, and refrigerate for at least one hour (preferably two to three).

Start your fire and prepare for indirect cooking at medium-high heat (about 300º).

Add a couple small chunks of fruit wood (apple or cherry) to the fire about 10 minutes before adding the meat. Wood chips soaked for 30-60 minutes will work well, too. If you're using a gas grill, make a smoker pouch.

Cook the ribs indirect about 2 1/2 hours, turning once at the halfway point.

Pour the apple juice into the foil pan.

Add the ribs to the pan and cover tightly with heavy-duty foil.

Put the pan on the grill and cook indirect another hour.

Remove the pan from the grill, uncover it and let the ribs cool about five minutes.

Shred the meat from the bones, discarding any fat or gristle.

Put a pile of pork on a bun, add some of your favorite sauce and some coleslaw, and you are on the business end of some fine eats.

Enjoy.

Labels: ,


Click to view a larger image
I was recently given the opportunity to review She-Smoke: A Backyard Barbecue Book. It's written by Julie Reinhardt. Julie and her husband own and operate Smokin' Petes BBQ in Seattle, so she certainly knows her way around a smoker.

Barbecue is largely the domain of men, so the title of this book was immediately intriguing. I've never really thought of barbecue and grilling as having a gender bias, it just seems that men naturally gravitate to it. I think it's one of the last vestiges of true old-school masculinity, but I digress. Bias or not, in the book Julie tries to help the ladies feel comfortable at the grill.

Here's how the book is described on the site dedicated to it:
Julie Reinhardt, empowers women to take their place back at the fire. In She-Smoke, Reinhardt gives step-by-step instructions on a variety of barbecue topics, from buying local, sustainable meats, to building the perfect slow and low fire, and smoking a holiday barbecue feast. She includes a host of delicious recipes aimed to teach women technique, with more in-depth instruction than that of a conventional cookbook. Women will learn the elusive history of ‘cue, the difference between true barbecue and grilling, and all about the world of barbecue competition. Featuring interviews with other “smokin’” women and stories about Reinhardt’s family, She-Smoke brings women into the greater community of barbecue.
The book is full of the typical barbecue recipes, and Julie brings some new things to the table. I especially found her "Pacific Northwest Salmon Bake" very interesting. That was certainly unexpected, but it certainly fits given her Seattle roots.

Where I found this book to really shine is in her in-depth explanations of the basics of barbecue and grilling. She covers all of the fundamentals, from meat cuts, to skinning ribs, to carving brisket, to fire tending and cooking times. She offers clear directions and step-by-step instructions throughout.

My only complaint about the book is its lack of photos. Instead, it contains hand-drawn illustrations. They get the job done, but sometimes you just need to see the real thing. One thing that people generally need in a cookbook is to know how the final product is supposed to look. In this case you'll have to lean heavily on your imagination.

The bottom line? If you have wanted to learn your way around the grill or smoker, this is an excellent place to start. Julie does an outstanding job of flattening the learning curve and providing solid instructions. However, this book isn't just for novices. It's also worthwhile for intermediate and even experienced cooks. I recommend it.

Labels: ,


Click to view a larger image
Last weekend my eldest daughter lobbied me to make stuffed peppers. I love them (my ladies and stuffed peppers) and, although they are typically a fall/winter dish, I was happy to accommodate her.

The only problem was that, at over 90º outside, I didn't want to heat the house up even further by using the oven. I used the opportunity to try cooking them on the grill (actually, my Ugly Drum Smoker).

If you dig stuffed peppers, try this sometime. Next time I might even try using chopped BBQ brisket and barbecue sauce instead of ground beef and tomato sauce.

Ingredients
8 Green bell peppers, even in size and shape
1 1/2 lbs Ground beef
2 cans (8 oz) Tomato sauce
1 medium Yellow onion, diced
3/4 cup Mushrooms, chopped (I used baby portabellas)
1/2 cup Long grain white rice, uncooked
2 Tbsp Dried Italian seasoning
1 Tbsp Garlic, minced
1 Tbsp Kosher salt
2 tsp Black pepper, ground fresh

Method
Cook the rice according to the package directions and set aside.

In a large saute pan over medium heat, brown the ground beef and drain any excessive fat (leave some).

While the meat is cooking, cut the top off of each pepper (about 3/4"), and remove the veins and seeds.

Put the cooked beef in a bowl and set aside.

Note: If there is very little fat left in the pan, add a couple teaspoons of canola or vegetable oil.

Add the onions and mushrooms to the pan and cook, stirring occasionally, until the onions are translucent.

Add the garlic to the pan and cook one minute longer.

Add the rice, beef, salt, pepper and one can of sauce to the pan and mix very well.

Arrange the peppers, open end up, in a large aluminum pan (see the picture).

Note: You may need to trim the bottoms slightly to get them to stand up.

Spoon the mixture into each pepper until they are 1/2" from being completely full.

Top each pepper with enough tomato sauce to cover the filling by about 1/4".

Sprinkle the top of each pepper with a little of the Italian seasoning.

Start your fire and prepare for indirect cooking at medium-high heat (about 350º).

Cook the peppers indirect for approximately 75 minutes, or until the flesh is tender.

Put the pepper on a plate, slice it in half vertically, and enjoy!

Labels: ,


Click to view a larger image
Here is an incredibly simple recipe for an outstanding relish to top grilled sausage. The ingredients are very common and consist of what you might normally put on a sausage or hot dog. However, mixing them and allowing the flavors to marry really does make it better.

You can use this on any grilled sausage, but it's particularly good on Polish sausage and hot links. I grilled some of my sister's venison brats for lunch today, so that's what you see in the picture.

As always, click the pic for a larger version.

Ingredients
1 cup Yellow or sweet onion, diced
3/4 cup Ketchup (Heinz, of course)
1/2 cup Sweet pickle relish
1/8 cup Your favorite hot sauce (I use Franks or Louisiana)

Note: Of course you can add more or less hot sauce to taste.

Method
Mix all ingredients well in a stain-resistant sealable container.

Refrigerate two hours, or even better, overnight.

Keeps for several months.

Labels: ,


Click to view a larger image
I received an ad earlier this week from the outstanding take-and-bake chain, Papa Murphy's, announcing their new pizza for grilling.

I was of course interested, so I called and asked a little about it. It turns out that it's their usual pizza but it comes with an aluminum pan. The word "with" is key here, as the pizza does not come in said aluminum pan, which came as a shock. It comes on their usual oven-safe cardboard pan.

When I saw the separate aluminum pan I immediately thought, "What am I supposed to do with this?!" My wife explained that I was supposed to grill the pizza on the cardboard pan for the first five minutes and then transfer it to the metal pan. What? Why don't they just make the pizza in the metal pan?! This was quite a mystery to me.

The grilling instructions call for the same temperature as for oven cooking; at least for a charcoal grill. I was planning to cook it on my Ugly Drum Smoker (UDS), so I thought, "Wait a minute. Why can't I just cook it completely on the cardboard pan like I would in the oven?" Heat is heat, and the pizza would be further away from the coals in the UDS than it is from the heating element in the oven. So that's exactly what I did.

I fired up the UDS and let it get to about 425º. I put the pizza on the top rack and cooked it for about 30 minutes. The average temperature was probably around 415º, so it required a little more time to brown up than in the oven.

As you can see in the picture (click it for a better view), it cooked wonderfully on the standard pan. The crust was perfect and there was no sign of burning. So, the next time you are in the mood for grilled pizza and you want avoid the hassle of homemade, grill up a Papa Murphy's.

Note The aluminum pan is almost certainly required for smaller grills where the pizza sits much closer to the fire. Please follow the directions in those cases.

<< Older Posts

Newer Posts >>


Popular Recipes
All-Purpose BBQ Seasoning Braised Nectarines with Champagne Honey Caramel Classic BBQ Chicken Drumsticks Cuban Rueben Grilled Chicken Cordon Bleu Homemade Hot Sauce Hungarian Braised Short Ribs The M.O.A.B. Pulled Pork Pockets Rattlesnake Tails Slammin' Salmon Sweet-n-Sassy BBQ Almonds View all of my recipes
 
Other Popular Posts
Competition BBQ 101 Review: Original vs Competition Kingsford® Charcoal Review: Kingsford® Competition Briquetes Discovery: Kiwi Knives Discovery: Quality Inexpensive Injector Book Review: Serious Barbecue