Yesterday I was contacted by a casting producer for ABC Television's hit reality show, Wife Swap. Here is a great opportunity for those interested.

CASTING SEARCH:


BBQ Cooking Competitors!

Casting Directors for ABC TV’s hit reality show, "Wife Swap", are now conducting national searches for fun, dynamic, outgoing and interesting families to star on Season 5 of “Wife Swap”.

  • Do you or all of your family members BBQ competitively?
  • Would you like to share your passion for BBQ-ing with another family?
  • Would you be excited about the chance to change the life of a deserving family or improve your own?

If so, we’d love to consider you for prime time!

To apply or get more information contact Jessica Jorgensen.

Note: Please mention that I referred you.

Competition BBQ 101
So far in this series I've covered the gear and the general flow of a competition. In this installment I'll give you my tips for a successful competition. These are the fundamentals that I've learned along the way.

For the past few weeks I've been mentoring a buddy of mine who will be competing for the first time next weekend. My advising him has renewed these basics in my mind, so I thought I'd capture them and pass them along.

Do your homework

There is so much to learn that your first competition can be overwhelming. Research and "BBQ recon" will dramatically help flatten the learning curve. I highly recommend reading everything you can get your hands on.


Of course, you will find that there is a lot of noise mixed in with the good information on the internet. That's why it's important to get your information from a variety of sources. You will quickly notice solid trends and those are the gold nuggets.

Practice!

As I wrote in the previous post in this series, I cannot overemphasize the importance of practice. Practice cooking one category at a time in mock competition. Do everything exactly like you plan to do it at a contest, including building practice turn-in boxes.

Once you are satisfied with each category, cook all four categories and invite some friends over to act as judges.

Rinse and repeat.

Keep it simple

There are already enough variables in competition cooking. Don't complicate things by trying to do things differently for each category. If you're like I was early on, you'll try to find a different rub, sauce and wood combination for each meat. Don't. Find one good flavor profile that works for all of the meats. There will be plenty of time for experimentation as you gain experience and confidence.

Focus on the basics

This dovetails with keeping things simple. Work on perfecting the basics such as:

  • Meat selection
  • Meat preparation
  • Fire/temperature control
  • Timing
  • Repeatable flavor profile
  • Garnish and presentation

Keep detailed notes

All the practice in the world won't help if you can't remember what you did from one cook to the next. A good set of notes and a cook log will help you find opportunities to improve. It's also important to take pictures. You know how many words a picture is worth.

Travel light

I touched on this in the post about the gear. Develop an equipment checklist (here's mine) and take only what you need. Of course, weather plays a huge role in that, so also plan for what you might need in a worst case scenario. Bottom line: don't take everything but the kitchen sink.

Have a plan

In the last post I also mentioned the importance of developing your own cooking timeline for each category. Start at the turn-in time and work backward in 15-30 minute intervals. This will really help minimize the "What should I be doing now?" chaos. The plan will boost your confidence because you'll know what to do when. If you've kept things simple and have practiced, you will be well on your way to a repeatable process. I wish I had done this early on.

Ask questions

The old "The only dumb question is the one that you don't ask" adage is infinitely applicable here. Find credible and experienced sources of information and ask a lot of questions. I think you will find that most cooks are more than willing to help, but they can't help if they don't know what help you need.

When you get to your first competition introduce yourself to other nearby competitors and flat out ask if they are willing to help with questions. Just be honest and I think you'll be surprised at the openness of many cooks.

Check your ego

You may be an outstanding backyard barbeque cook and your friends, family and neighbors may rave about your food, but that is a far cry from competition cooking. Keep in mind that those close to you are not usually brutally honest about your food. They will usually be nice because they have good social graces.

Judges, however, don't know which turn-in belongs to whom because the system is designed that way. Judges are also very clinical in their evaluation, which is as it should be. You will find very quickly that judges are indeed brutally honest.

Given all this, check your ego in the parking lot and do your best. I think you'll find that the system works fairly well, but it is also very efficient at dispensing humility.

About partying

Competitions are fun. That's a large part of the allure of competition cooking. I encourage you to invite your family and a few friends and have a good time. At the same time, I also discourage you from partaking of too many adult beverages and taking your eye off the ball.

It's not a family reunion, it's a competition with money on the line. You've (hopefully) worked too hard and invested too much time and money to let this turn into a bad episode of MTV's Spring Break Marathon.

Buck trends at your peril

This goes hand-in-hand with doing your homework and checking your ego. If you do diligent research you will quickly note some distinctive trends in flavors and processes. Don't try to swim upstream. Keep in mind that much of what you will read are lessons learned as the result of the trial and error of others. You will also notice that the cream of the competitive crop are very consistent. They find something that works and they continually polish it.

I am not at all discouraging experimentation and creativity. I'm simply saying that bucking major trends is not generally advisable.

Have fun!

Much like any other avocation, if you stop having fun, it's time to look for another way to spend your time. Competition barbecue is hard work, but it's also a lot of fun (or should be).

Other installments:
The Gear
How It Goes Down
Q & A With a First-Time Competitor

Labels: ,


Click to view a larger image
Last week I was contacted by the publisher of an upcoming barbecue book asking for a review. The authors are barbecue legends Ardie Davis and Paul Kirk, and the book is entitled America's Best BBQ: 100 Recipes from America's Best Smokehouses, Pits, Shacks, Rib Joints, Roadhouses, and Restaurants. The book is due out in May.

I really enjoyed Paul Kirk's Championship Barbecue, so I am looking forward to the new book. I should have the book soon, so stay tuned.

Labels:


Click to view a larger image
Well folks, it's now officially spring and that means that the competition season is upon us. My first contest of 2009 will be just a few miles from here at the Gourmet Grills Big Chill Cookoff in Kuna, Idaho on April 3rd and 4th.

Since it's been nearly seven months since I built a competition turn-in box, I figured that it was time to practice. What better practice is there than on one's worst category? In my case, that would be pork ribs. I've tweaked and re-tweaked my recipe and process, and for the first time I am happy with the results.

This box is rough around the edges and could use a lot more attention to detail. I sort of rushed it, which of course negates some of the reason for practice. It's hard for me to get that competition adrenaline and anal-retentiveness pumping at home.

Note: Please excuse the picture quality. My wife took the Nikon D50 with her to SoCal.

Labels:


Click to view a larger image
This, ladies and gentlemen, is the mack daddio heavyweight chimney champion of the world. It's made by Chesterfield and it's a brute at 18 inches tall, 8 inches in diameter and 6 pounds! As one of my barbecue buddies said, you could almost leave the cooker at home and just cook on this thing.

Click the images for a larger view.

Click to view a larger image
I ran across this strictly by accident at a local Sportsman's Warehouse store. Here's the kicker... It was only $19.99 and that was not a sale price. There is absolutely no contest when you stack this bad boy up against the $15 Weber chimney. Don't get me wrong, I'm a huge fan of Weber, but I am really tired of burning through their chimneys like President Obama burns through teleprompters.

If you have a Sportsman's Warehouse in your area, stop reading this and call them to see if they have one of these. If so, buy it and thank me later. Better yet, buy all they have and sell them at double the price at your next competition.

Afterthought: Who knew that China is a hot bed of barbeque?

Note: I have scoured the internet for other sources for this chimney, but not only did I not find anyone selling them, I couldn't even find any information on the manufacturer.

Labels:


Click to view a larger image
Tonight was an excellent case study in that age old axiom, "The best-laid plans of mice and men often go awry." I don't know about you, but I often find that magic happens in the kitchen when there are no formal plans or pressure. That certainly proved to be the case for me tonight.

Click to view a larger image
Here I had planned a wonderful send off meal for my family before they take to the sky headed to SoCal tomorrow. I had two nice tri-tip that I lovingly marinated in my "bold" rub. I then proceeded to lovingly overcook them because the probe of my thermometer failed me. I suspected that something was amiss, but rather than trust my gut, I fell victim to the dreaded thermometer fixation.

Despite the overcooking, the beef turned out pretty decent. They were basically little briskets. The flavor was great, and they were still pretty tender. This assessment is, of course, after a couple hours of honest reflection.

Oh well, there is always next time. It was still a really nice dinner and we got to hang out with my sister, which is always a treat. She took home some leftover cow and the rest of the Pomegranate Chile Lime Glaze.

Update 03/22/09

Click to view a larger image
What does one do with leftover tri-tip? Well, there are all kinds of great uses for it, but one of my favorites is a tri-tip cheese steak. Slice it thin, warm it up, put it in a cheese-lined hoagie roll and top with sauteed onions and peppers.

Serve it on a very elegant paper plate.

Labels:


Click to view a larger image
This glaze is a little out of the ordinary, but the flavors work very well together. It's fruity, but not too fruity. It has a little kick from chiles and a tang from the pomegranate and lime. It's more tangy and savory than sweet.

As always, click an image to see the larger version.

Ingredients
4 cups Pomegranate juice (100% pomegranate -- not a blend)
2 cups sugar
Juice of one lime, strained
Zest of 1/2 lime, minced
1/4 cup Mae Ploy sweet chili sauce (Asian section of your supermarket)
2 Tbsp Mirin (Asian section of your supermarket)
1/4 tsp Ground chipotle chile
1/4 tsp Ground ancho chile
Pinch of ground allspice

Method
Combine the pomegranate juice, sugar and lime juice in a medium non-reactive sauce pan over medium-high heat. Do not use aluminum of any kind -- not even anodized. Think stainless steel.

Stir the mixture well and let it come barely to a boil, stirring until the sugar is disolved.

Reduce the heat to medium-low and simmer until the liquid is reduced in volume by half (about 70-90 minutes).

Remove the pan from the heat, add the remaining ingredients, and mix well.

Let cool and store in the refrigerator. It will keep for several months.

Click to view a larger image
I used this glaze tonight on a smoke-grilled pork tenderloin and I received great reviews. I was afraid it would be too bold for the kids, but they loved it. It really does work well with pork. I think it would also shine on duck and game, like venison.

Labels: ,


BBQ Central
Last night I was fortunate to be on the venerable Greg Rempe's BBQ Central Radio show. It went surprisingly well and I didn't even make a fool of myself. Greg was a great host and made it easy for a newbie like me.

If you like talk radio and you like cooking with fire, I highly recommend Greg's show. He takes what otherwise might seem like pedestrian topics and presents them in a way that is fun and engaging, while still very informative.

You can hear the show I was on here. I followed Chris Capell of Dizzy Pig BBQ. Chris is a very successful competitor and commercial rub maker, so that made it that much more special for me as a fellow barbeque competitor. If you need rub, call Chris. Give him a couple years and he'll probably have more flavors than Baskin-Robbins.

The recipes and processes we discussed on the show can be found here.

Note: The show podcast is also available on iTunes. Search for "The BBQ Central Show on LA Talk Radio" (no quotes of course).

Labels:


Bacon-Wrapped Mushrooms with Artichoke Stuffing

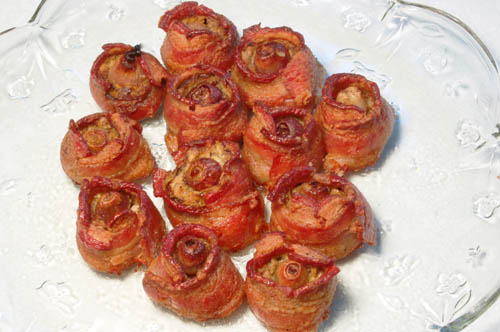
These mushrooms are a little more complicated than your average stuffed mushrooms, but the result is simply divine. The combination of mushroom, artichoke hearts and onion all wrapped in bacon creates a simply magical layering of flavors.

As always, click an image to see the larger version.

Ingredients
12 medium-small Crimini mushrooms (about 1 ½" diameter)
12 slices Bacon, sliced thick
12 Red pearl onions (about 3/4" diameter)
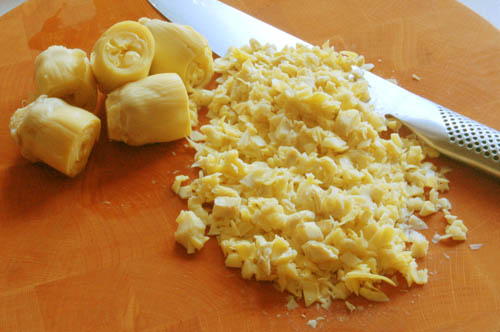
1 can (15 oz) Artichoke hearts, drained
3 Tbsp Extra virgin olive oil
2 tsp Garlic salt
1 tsp Ancho chile powder
1/2 tsp Cayenne chile powder
Fresh ground black pepper

Method
Drain the artichoke hearts well. Dice them to about 1/3" until you have about one cup. Put the diced artichokes in a small bowl and add the olive oil, and both kinds of chile powder. Mix well and set aside.

Bacon-Wrapped Mushrooms with Artichoke Stuffing

Remove the stems from the mushrooms and use a teaspoon to gently hollow them out. You want to remove all of the dark gills and scrape down until you just start to see the white flesh. Fill each cap to just a little past level with the artichoke filling. Do not pack the stuffing more than just enough to fill the cap.

Bacon-Wrapped Mushrooms with Artichoke Stuffing

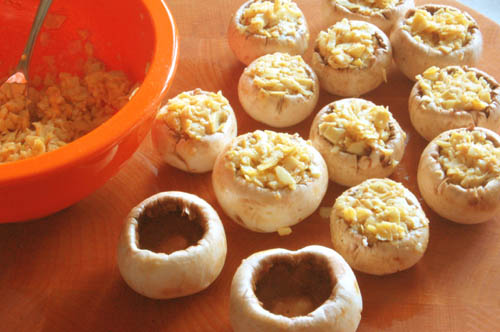
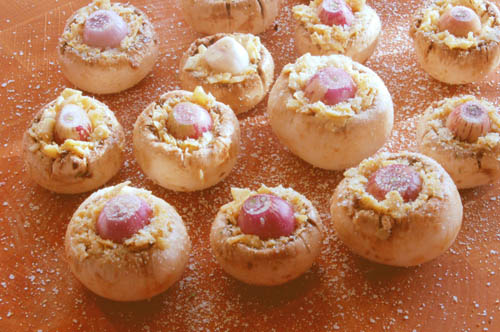
Slice off both ends of each pearl onion. Gently peel off the paper and the first layer of flesh. This is a little tedious, so be patient. Push one peeled onion into the stuffing of each mushroom cap, leaving half of each onion exposed. Sprinkle each cap moderately with garlic salt.

Bacon-Wrapped Mushrooms with Artichoke Stuffing

Use about 4/5 of a slice of bacon to wrap each mushroom as shown in the picture. You need the ends of the bacon to overlap by about an inch. Pin the ends of the bacon together with a toothpick as shown.

Bacon-Wrapped Mushrooms with Artichoke Stuffing

Make four small equally spaced slices in the part of the bacon that extends above the top of each mushroom. This will allow the bacon to form around the top of the mushroom.

Sprinke each mushroom moderately (or to taste) with black pepper.

Put the mushrooms on an oiled broiler pan and into a preheated 350º oven. Bake for approximately 90 minutes, or until the bacon around each mushroom is just barely crisp.

Put the mushrooms on a serving platter, removing the toothpick from each one. To make the toothpick removal easier, spin it between your index and second finger (like you would wind a watch) while you pull it out.

Serve and enjoy these while you can, because they won't last long.

Tip: Here is a much simpler and less time-consuming way to peel the pearl onions.

Idea: These would be excellent with a half-and-half mixture of lump crab meat and artichoke.

Note: Of course you could do these on the grill with indirect heat, but I would not recommend smoking them (gasp). I think it would be way too easy to overpower the flavors.

Labels: , ,

You may have noticed the Foodbuzz "Featured Publisher" badge in the top right corner of the page. Foodbuzz is a great site for people interested in an online community for sharing recipes and food-related information. You can think of it as a sort of "Facebook for foodies".

In addition to sharing, the site uses a "buzz" rating system for each item (recipe, photo, blog post, etc.) that is posted. This is a score (zero to 100) that indicates the relative popularity of the item. Other foodies can even rate the items and leave comments.

If you've never been there I encourage you to check it out. You can view my profile here.

Click to view a larger image


Update: BBQ World Magazine is no more


Since I entered competitive barbeque cooking I have often thought that the "sport" needed a magazine. There are other specialized cooking magazines, but until very recently there was almost nothing for those of us who are passionate about barbeque.


Well, that has changed with the unveiling of BBQ World Magazine. Folks, this is no glorified newsletter, this is the real deal. I'm talkin' about a four-color, glossy Sports Illustrated for meatheads. Click the images on the left to see what I mean.

Click to view a larger image
Not only does it look great, but the content is top-notch. The premier issue features an interview with Mike Davis and a story about growing up in Mike Mills' family. That's two big-time barbeque champions in just the first issue! It also includes recipes (of course), competition team "spotlights" (bios), a bunch of event photos and a schedule of upcoming events. This first issue even had a centerfold of the behemoth Johnsonville Brats grill.

If you are serious about barbeque this is a must-read. Terry Welch and his team are helping to give our passion the coverage that is long overdue.

Click to view a larger image
I picked up this injector tonight at Bed Bath & Beyond. The quality is impressive at $12.99. The reservoir is acrylic that is wrapped in stainless steel. The capacity is 1.5 oz, and the thing is pretty hefty for its size and appearance.

One of the standout features of this injector is the dual needles that have a single opening at the tip. The larger of the two needles has an opening that is probably 3/32" wide, which makes it perfect for injections that have larger grains, or are more viscous. It also has no small gaskets or other parts to lose, and it's dishwasher-safe. Click the image to get a better view.

I have been on the lookout for a quality inexpensive injector and I think I've found it. It even comes in a very cool case. You can see a picture of the case in the upper-right corner of the box.

Note: On the packaging it says "Made Expressly for Bed Bath & Beyond", so I don't know where else it might be available.

Afterthought: Isn't that bird on the box hideous?! How hard is it to get a good picture of an uncooked and properly seasoned chicken or turkey?

Labels:


Click to view a larger image
Do you love good old school comfort food? Do you want a quick and easy meal that tastes like you spent all day in the kitchen? Do you feel like something hearty for Sunday lunch on a cold day? Are you scratching your head wondering what in the world you're going to take to that potluck? Well, this version of the old southern classic will nicely fit any one of those situations. As it happens, I made this last Friday night because I had two sick ladies at home.

The "cheater" in the title means that we are going to make use of mostly store-bought ingredients. However, I assure you that there is no compromise in flavor or comfort. If it helps, think of it as 'love in a can', or 'love on the run'.

As always, click the image to see the larger version.

Ingredients
1 Store deli rotisserie chicken
1 carton (26 oz) chicken stock (not broth)
1 large can (26 oz) Cream of chicken soup (I use Campbell's)
1 can Flaky biscuits
2 cups Water
1/2 med Onion, diced
3 stalks Celery, split lengthwise and sliced about 1/2" thick
1 cup frozen carrots (optional)
2 tsp Seasoned salt (I use Lawry's)
1 tsp Garlic salt
1/4 tsp Dry poultry seasoning

Method
Remove the skin from the chicken and pick all of the meat off. Cut/tear the meat into bite-sized pieces, and set aside.

Heat a stock pot over medium-high heat, add the celery, onions, and both salts.

Saute the onion and celery about three minutes, stirring often. You don't need any oil. Don't worry if it starts to brown and stick a little. The next step will take care of that.

Add the stock, water and soup to the pot, reduce the heat and let it come to a simmer. Simmer 10 minutes, stirring occasionally. You might need to whisk it a little to get the soup to fully incorporate.

While the liquid is simmering, flour both sides of five of the canned biscuits. Using a rolling pin, roll each biscuit out to about 1/8" thick. Cut the biscuits into 1" wide strips and cut the long ones in half lengthwise. You now have dumplings, so set them aside.

Note: The flour is key, as it will help thicken the liquid.

Add the chicken, poultry seasoning and carrots (if desired) to the pot and increase the heat to medium-high. Bring the liquid just to a boil (it must be boiling).

Drop the dumplings into the boiling liquid and stir just enough to ensure they are all as submerged as you can get them. Stir gently so that you don't break up the dumplings.

Let the pot boil gently uncovered for about 10 minutes, softly stirring/folding occasionally.

Remove from the heat, pour into a serving dish and let stand about 10 minutes.

Serve and enjoy!

Labels: ,


Barbequed chicken, pasta, and a smoky creamy cheese sauce, what's not to like about that? This is a great answer to the question, "What in the world can I do with all this leftover barbequed/grilled chicken?!".

I whipped this up with some simple smoke-grilled chicken breasts, but I think smoked chicken would be better. Shoot, you could even do this with one of those grocery store rotisserie chickens.

As always, click an image to see the larger version.

Ingredients
1/2 lb Fettucine
3 Grilled boneless/skinless chicken breasts, sliced in 1/4" slices
1 can (14.5 oz) Diced tomatoes with onion and green pepper
1 jar (15 oz) Classico Four Cheese Alfredo sauce
1/4 cup BBQ sauce
1/4 cup Water
2 tsp Hot sauce
1 tsp Smoked paprika
1/2 tsp Black pepper, ground fresh

Method
Cook the pasta according to the package directions while you prepare the sauce.

Click to view a larger image
Heat a large pan over medium-high heat and add the can of tomato/onion/pepper. Saute until about half of the liquid has reduced, then add the chicken. Continue sauteing until almost all of the liquid has evaporated.


Click to view a larger image
Reduce the heat to medium and add all of the remaining ingredients, except the pasta. Cook this for about five minutes, stirring occasionally. Be careful to not let the sauce scorch. If that starts to happen, reduce the heat.


Click to view a larger image
Add the drained pasta to the pan and toss well for several minutes. You want the sauce to nicely coat the pasta without becoming too dry. If it starts to get too dry, just add a splash or two of milk.


How's that for a quick and easy meal? This is one of those recipes that is wide open for creative alterations. It would also work very well with grilled Italian sausage.

Labels: , ,

<< Older Posts

Newer Posts >>


Popular Recipes
All-Purpose BBQ Seasoning Braised Nectarines with Champagne Honey Caramel Classic BBQ Chicken Drumsticks Cuban Rueben Grilled Chicken Cordon Bleu Homemade Hot Sauce Hungarian Braised Short Ribs The M.O.A.B. Pulled Pork Pockets Rattlesnake Tails Slammin' Salmon Sweet-n-Sassy BBQ Almonds View all of my recipes
 
Other Popular Posts
Competition BBQ 101 Review: Original vs Competition Kingsford® Charcoal Review: Kingsford® Competition Briquetes Discovery: Kiwi Knives Discovery: Quality Inexpensive Injector Book Review: Serious Barbecue